Table of Contents
Introduction
THIS IS A WORK IN PROGRESS. THINGS MAY LOOK OFF.I AM DEVELOPING THIS TUTORIAL AS MUCH AS I CAN.
Feel free to message any contributions/suggestions/concerns @ :Thecreator@gmx.com
In 1988, the Pullinghurst brothers were inspired by the glowing strata of Mount St. George and thus named their company STRATA. STRATA offers two 3D graphics software products in the United States: STRATA Studio for beginners and STRATA StudioPro.STRATA utilizes Apple's QuickDraw 3D hardware accelerator board for improved speed and power, as well as transparent modeling windows. The software also supports multiprocessing, which leads to faster processing of intensive tasks like modeling and rendering. The use of 3D metafile (3DMF) format for storing graphics information, including textures and geometry, enables compatibility with other applications that support 3DMF. This allows for cutting and pasting of 3D objects, including light source information and textures, between 2D and 3D applications that support 3DM used by various 3D artists alike Infmamously, The Strata software was used in the Development of Myst, as well the models for the Japanese adventure Video game Garage Bad Dream Adventure.The software was popular amoung designers like Ichiro Tanida
Wireframe from the making of myst

Ichrio used the software only because it was the most popular at the time

Creator of Garage is said to have used Strata in the early stages of his game to create the FMV's
Today, Strata isn't the leading 3D software, Its quite slower compared to Modern software. The graphics engine bundled in later versions was Radosity, A slower engine for the time compared to Raytracing. Strata Does use Raytracing as well.
Requirements
The software requires Mac OS 7.1 or later. If you're using Mac OS 9.2 on your machine, you can use this site to easily install Mac OS 9. After installation, navigate to C:\Users\User\MacOS9\Programs\Virtual\Desktop, paste your Strata Version there, and double-click the .sit file. You'll be prompted to extract the files, which you can do by navigating to the extracted location. Some Strata versions come as a single installer or a series of disk image files. If you have disk image files, mount all of them and run the installer, which is usually located on the first disk. Once the installation is complete, restart your computer.
Strata versions can be found on Macintosh repository and archive.org. Note that Strata 2.5 will not work on emulators.
For Linux users, you can install SheepShaver and use it with OS images. They provide more space, but you'll need to navigate to where the SheepshaverGUI executable file is located if using on Windows.
If you prefer hardware, you can find a Macintosh (Quadra, PowerMac G3 or G4) with Mac OS 7.0-10.2 on eBay or FB Marketplace. A graphics card, specifically an ATI Rage card with PCI, is recommended for optimal performance. We also suggest using a CRT when using vintage software, as limited colors can be found on a Cathode Ray TV compared to a flat panel or LCD monitor. A cheap Wacom tablet, such as Wacom Artpad or Digitizer 2, is a good investment. Installing software on a Beige G3 can be done using its disk drive. However, if you do not have the physical software, you will need to burn it onto a CD-R or CD-RW. Using rewritable CDs is recommended as they can be reused if the burning process is not successful. To burn CDs on a Mac, you can use Macdisk on Windows(or Wine for linux)to create a disk file.After creating the disk file, you should create an ISO and burn it using your preferred burning software.
You can also try using the web-based Mac emulator, Macos9.app, but it may not have enough space to work properly.
Basics.
I am Basing this off techinical books from the wizard of this software Hiroshi Dava. It was very difficult to find early manuals that aren't in japanese. For the most part, He uses Strata Vision 3D as a demostration in this particular book. However, It should be noticed there is very minor differences and only a few added features between versions up to STRATA STUDIO PRO 2.5. But the UI seems to remain the same across each version of Strata with a few features added to each version.
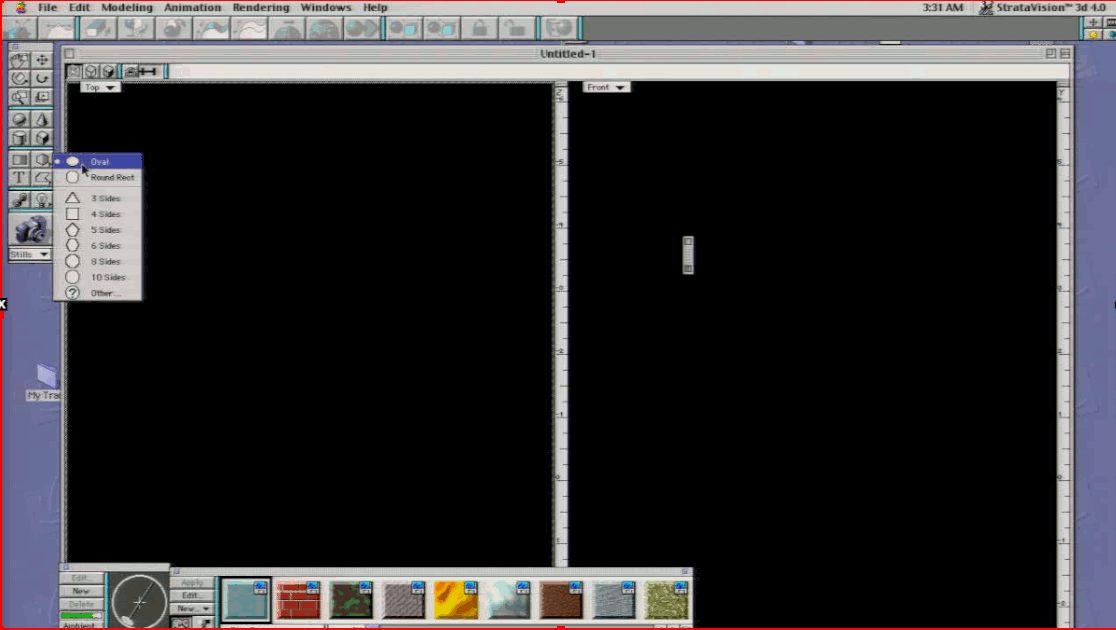
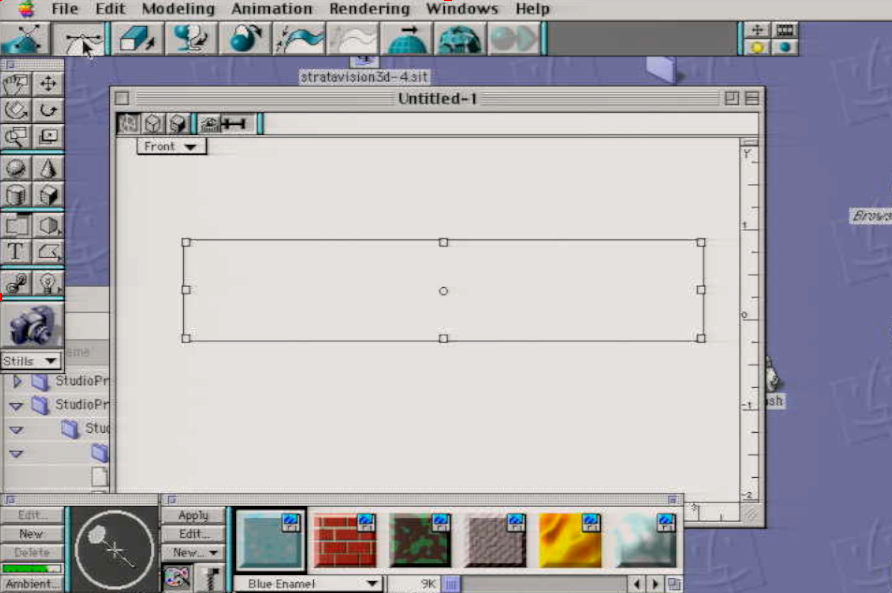
Here is a picture of the UI in stratavision when you click new file:
from left to right from the icons view:
- 3D sculpter,
- 2D Sculpter,
- Extrude,
- Bevel,
- Lathe,
- Sweep,
- Skin,
- Unskin
- Facet,
- Smooth Modeler,
- Boolean,
- Group,
- UnGroup,
- Lock,
- Unlock,
- Re-center view,Move Object,
- Free Rotation, Rotate Object,
- Zoom,Scale,
- Sphere,Cone,
- Cylinder, Cube,
- Rectangle Edge(left)-Rectangle Fill(right),Oval edge(left)-oval Fill (right)- DropDown:oval,Round Rect,3 4,5,6,7,8,9,10 sides with other creating a custom amount,
- text,Line tool(open,closed and fill),
- Link,Light
- Render(by dragging to the view)
The bottom panel is how you'd like to render the image, for intstance. You could render your geometry in a van gough effect which creates a weird watercolor effect. you can change how shaded the geometry is in the dropdown as well(good,better,best)
- Move view,Move Object,
- Rotate View, Rotate Object,
- Zoom,Scale,
- Sphere,Cone,
- Cylander, Cube,
- RectPolygon Edge(left)-RectPolygonFill(right),SpherePolygonedge(left)-spherepolygon Fill (right)- DropDown:oval,Round Rect,3 4,5,6,7,8,9,10 sides with other creating a custom amount,
- text,Line tool(open,closed and fill),
- Link,Light(point,Spot)
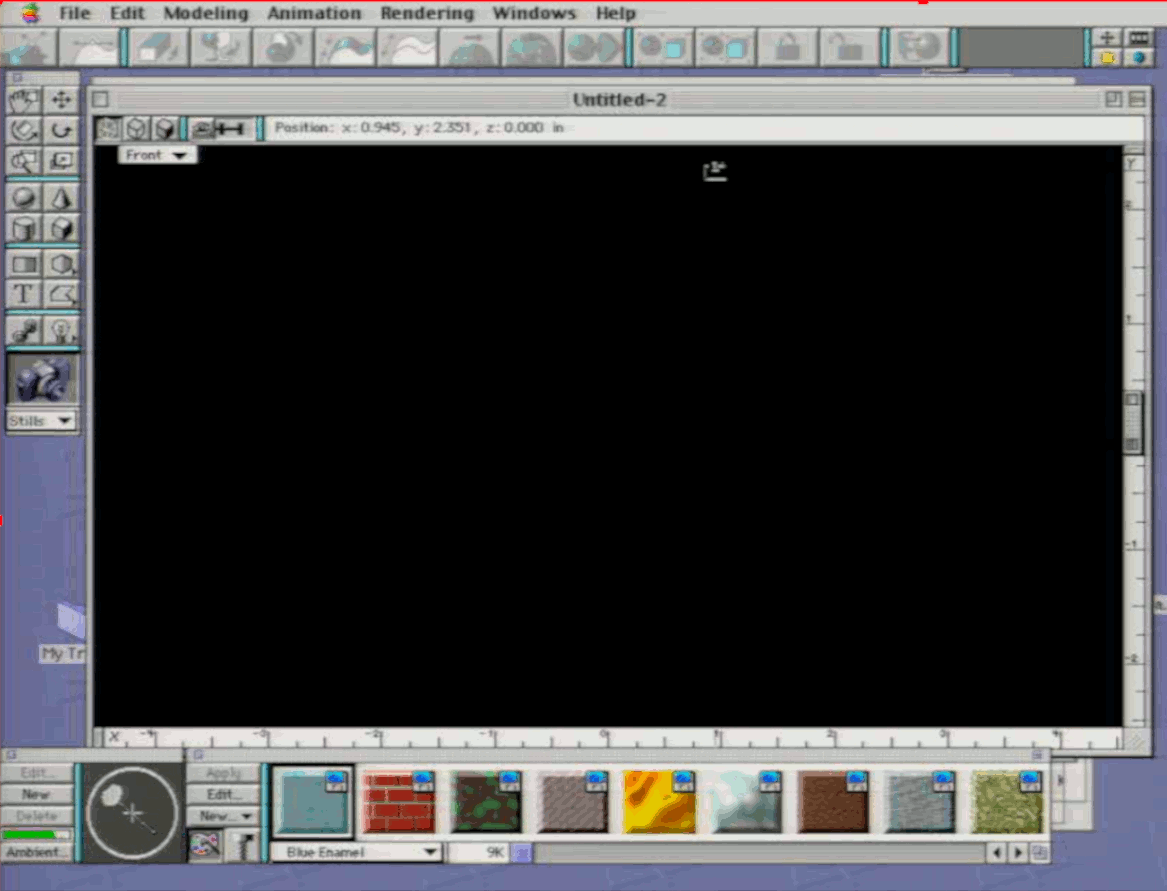
lastly, the bottom panel has options to adjust the ambient light and direction of the light(left), and the right panel has pre-default textures to choose from, you can create new textures and edit them, I will go over these later.
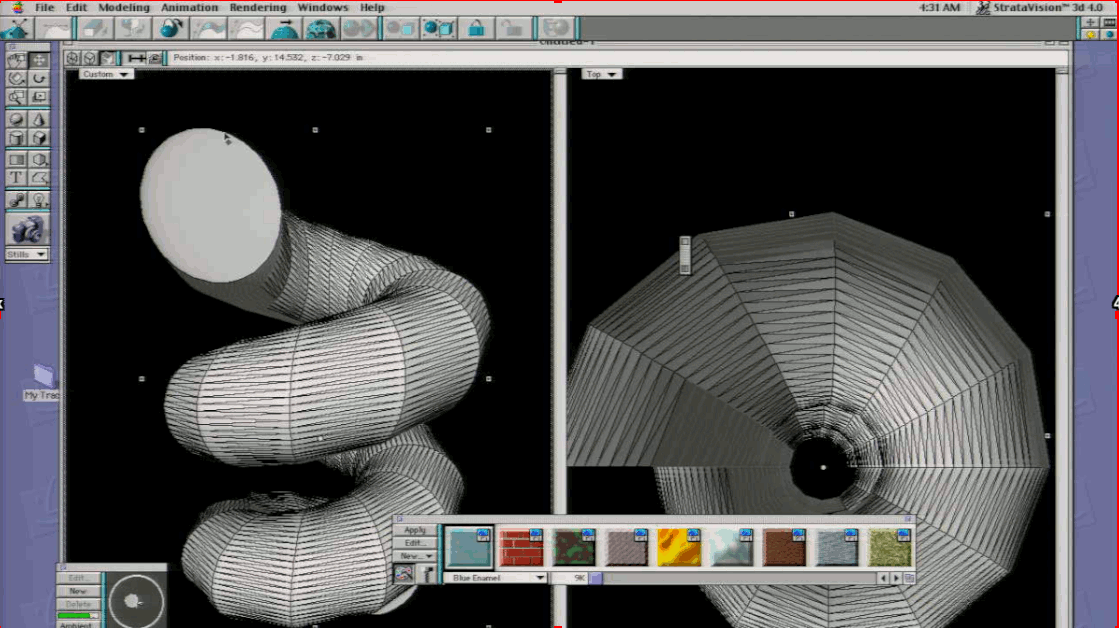
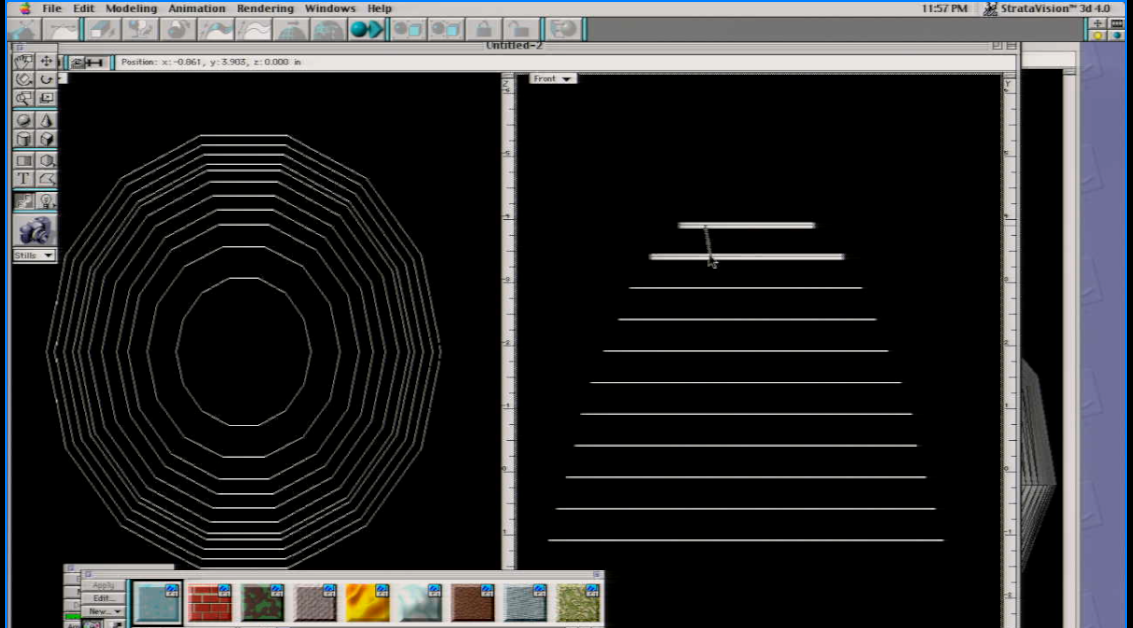
Making Coils(using the sweep function)
This more of a tutorial of how to use the sweep function. It is realtivly easy to use this function. as you select a flat polygon. What is tricky is visualing horizontial,vertical, outward(at least for me at first)
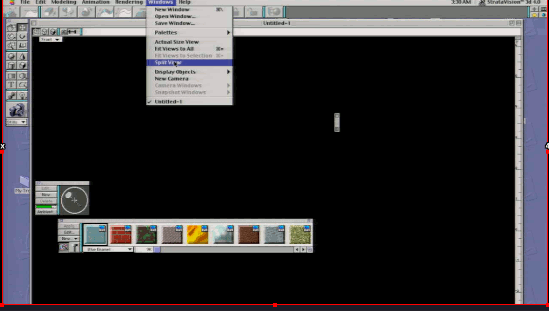
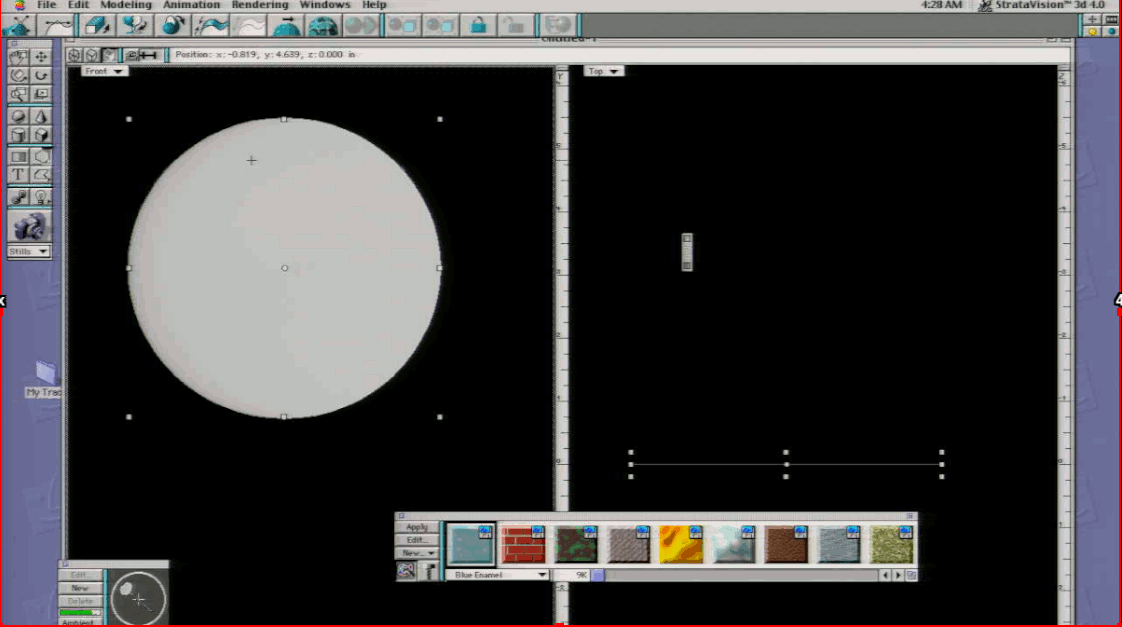
Create a new file, then go to Windows> Split view, Set the left view to top and the right view to front
click the desired shape, I choose an oval for this example
Drag the oval from the top right to the bottom right. Make sure the view is set to othrographic in the viewport
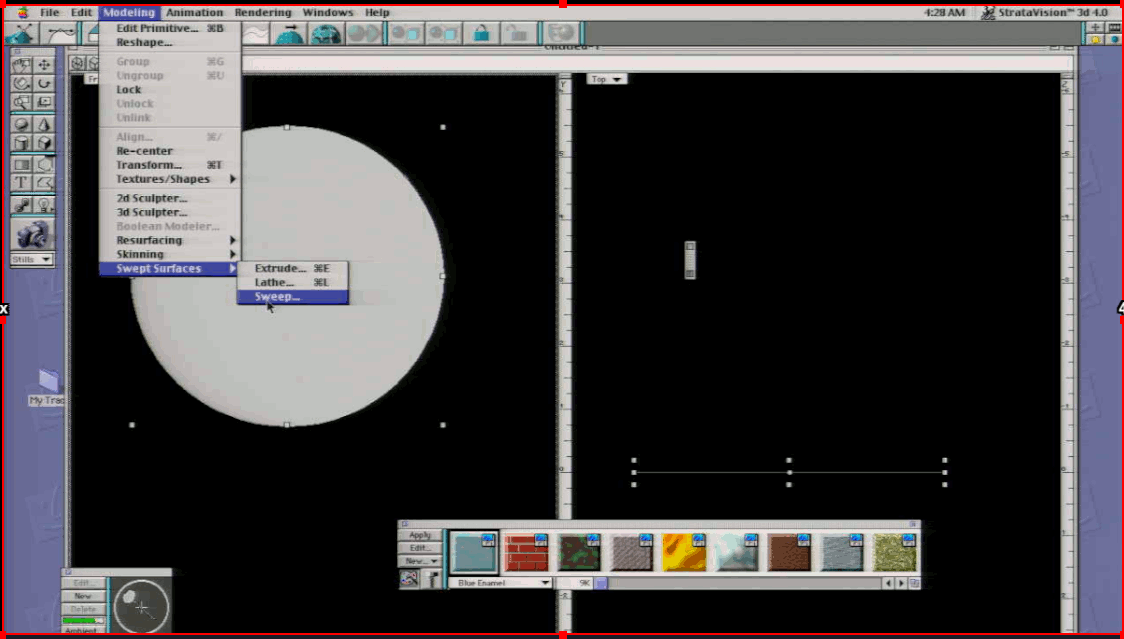
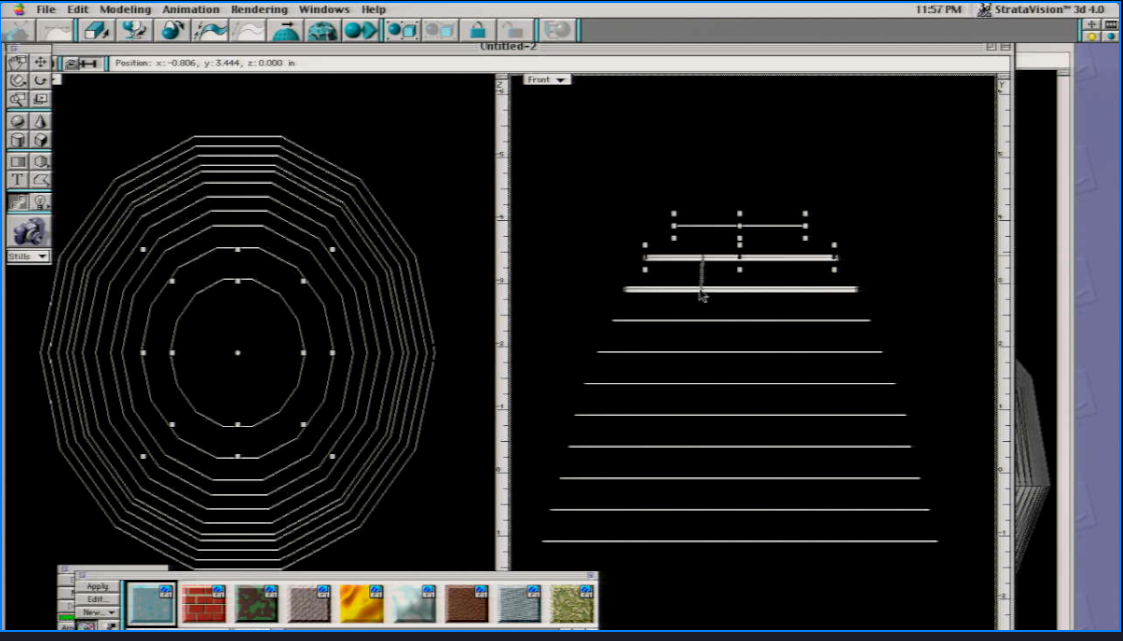
you can click from the the button on the panel in order to sweep. or go click modeling>Swept sufraces>sweep
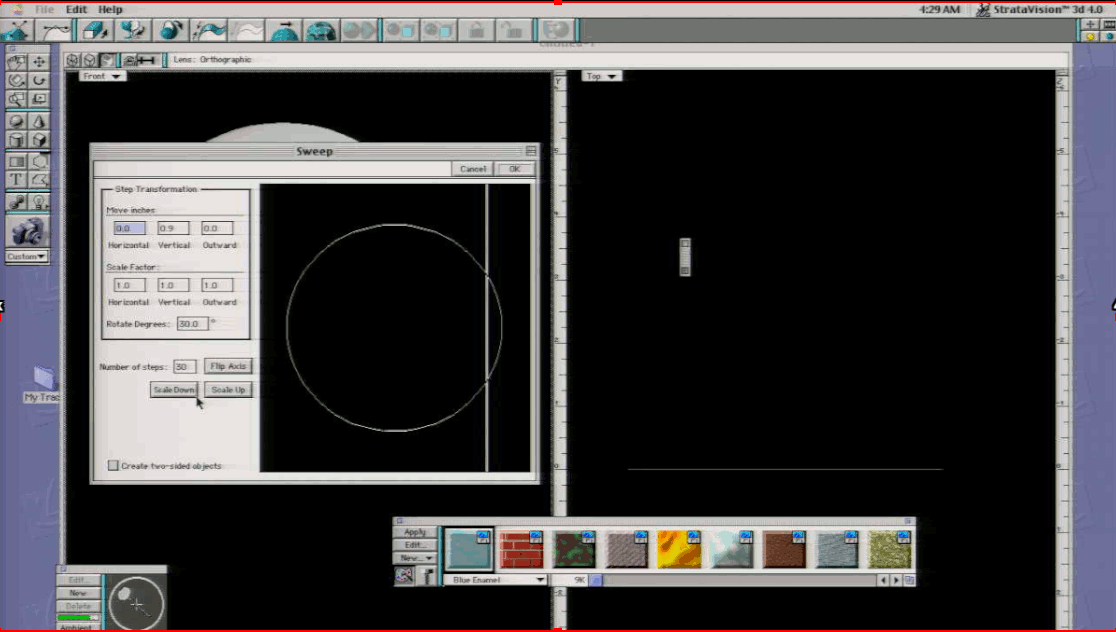
Set the parameters 0 horizontial, 0.9 vertical, 0 outward. Move the Dividing bar all the way to the right
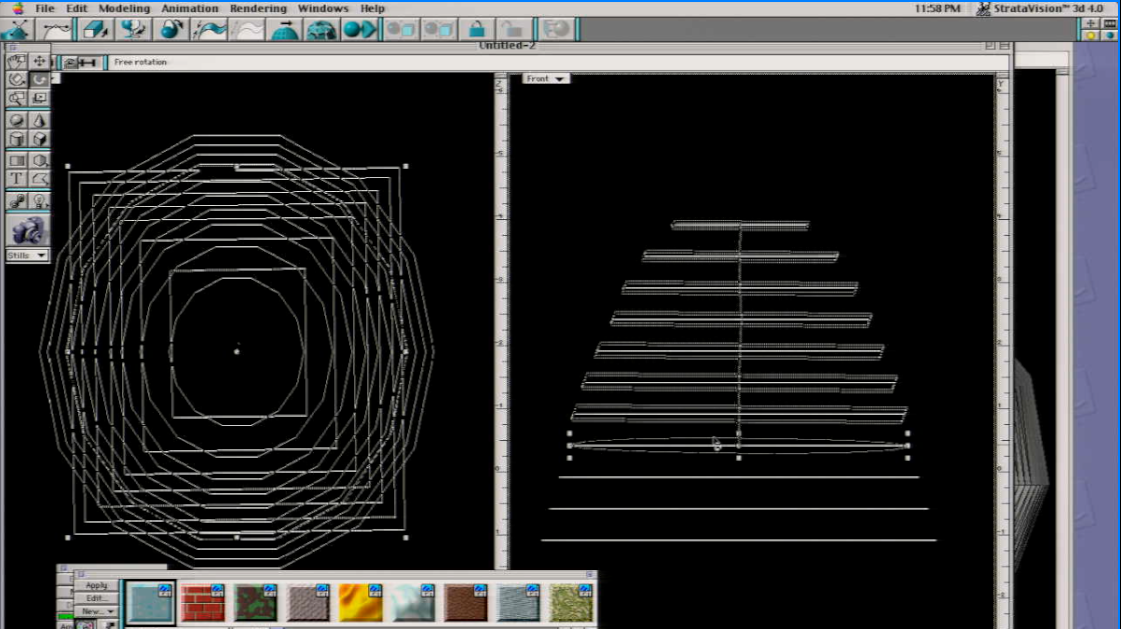
This is the result. The model can be reswept to your liking by going back into modeling>Swept sufraces>sweep
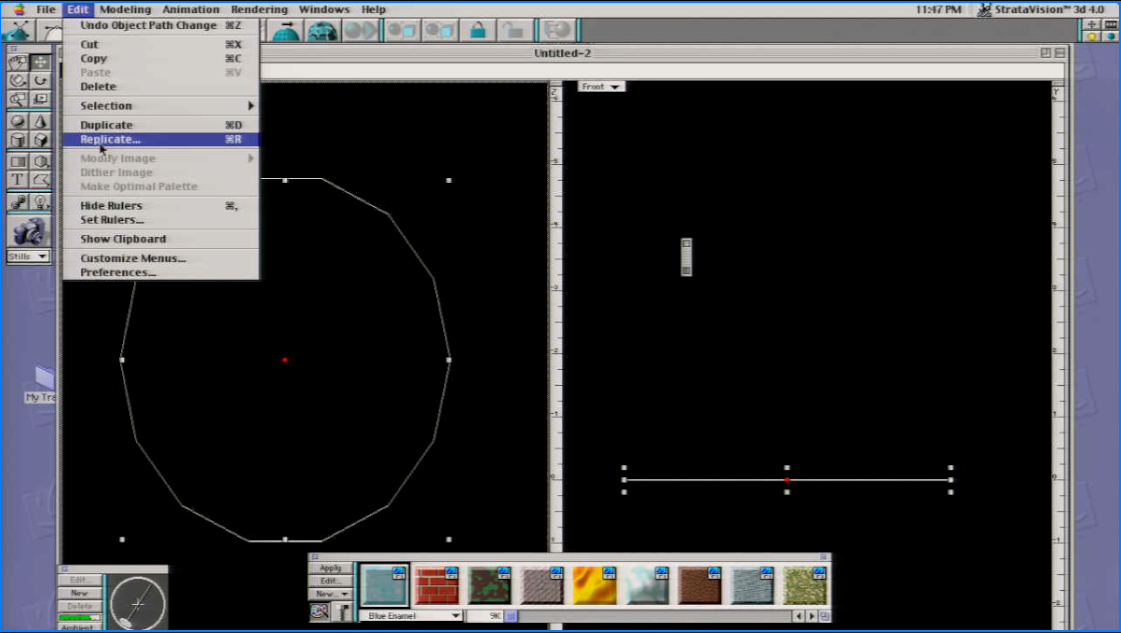
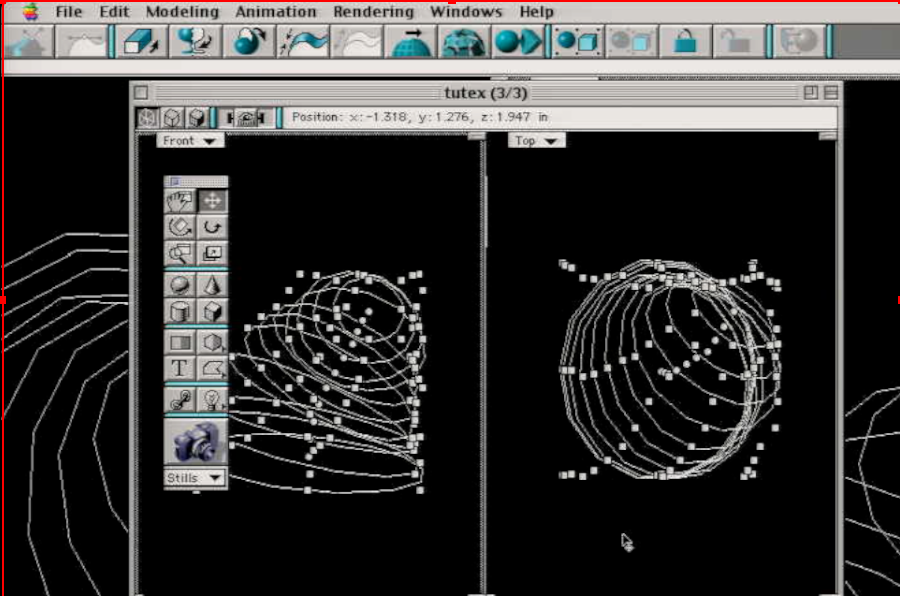
Linking and Skin Function
This function is perhaps one the most useful tools, once you figure how the it works, you become way more effiecnt and making organic forms, But it is one of the more difficult tools to use because it requires a bit of practice. Here is some steps to walk you through how to create a hat using the polygon tool:
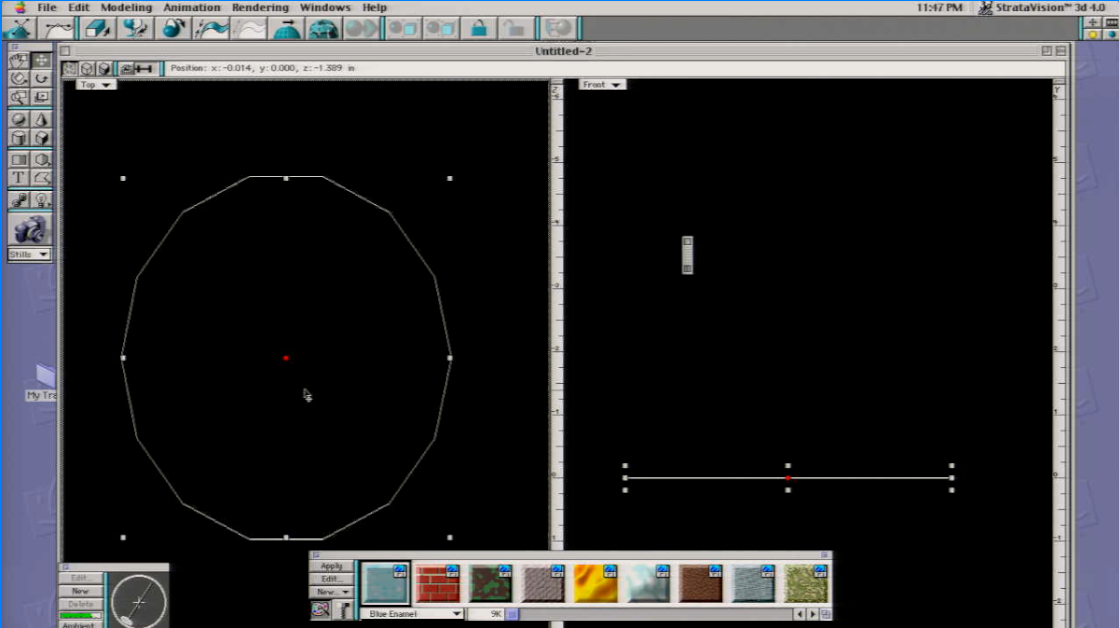
Create a new file, then go to Windows> Split view, Set the left view to top and the right view to front
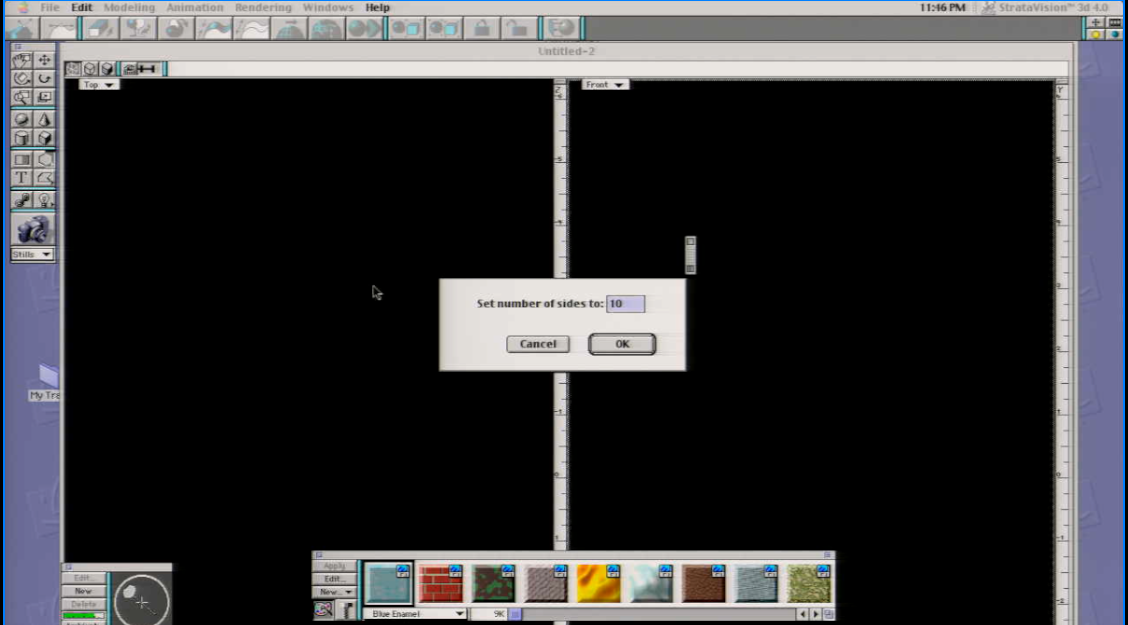
Then go to the Oval polygon tool and select "Other"
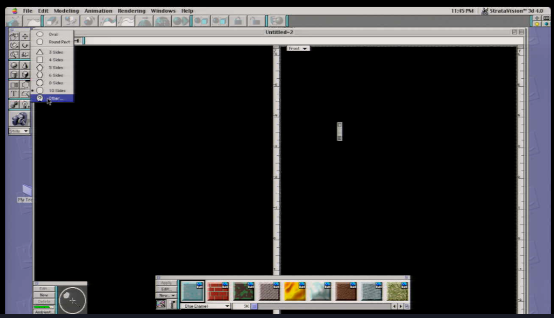
Set the number of sides to Ten
drag the polygons from the top left to the bottom right so it fills the screen.
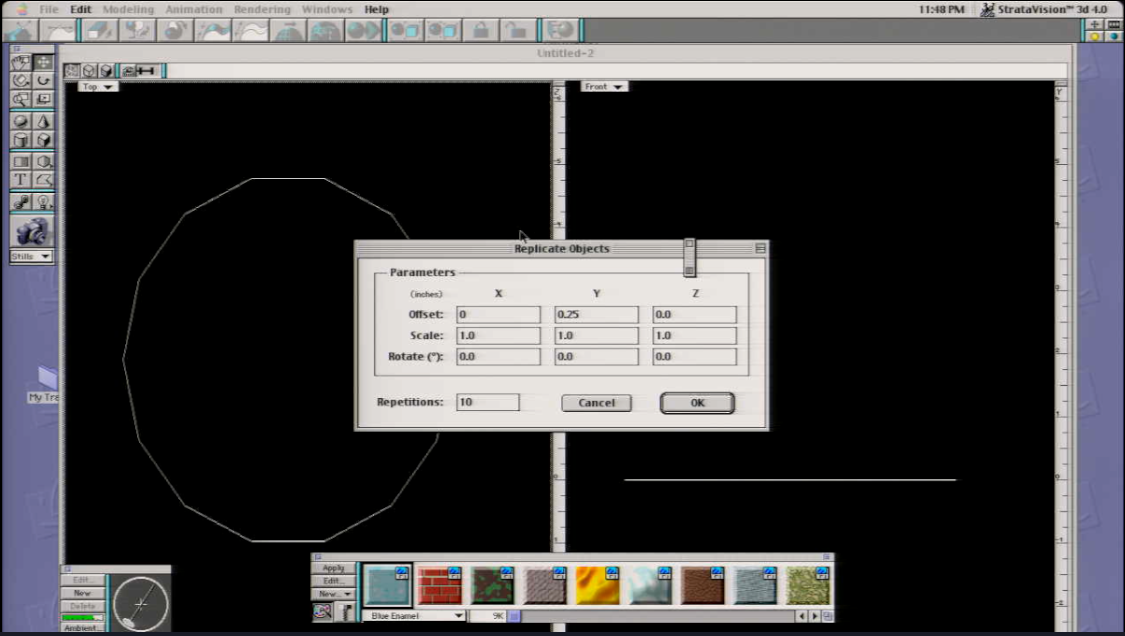
In the edit menu, Click edit>replicate
Offset the Y axis By 0.50(ignore the offset parameters in the image),Keep the scale at 1.0 on all three, have the the rotation at 0.0
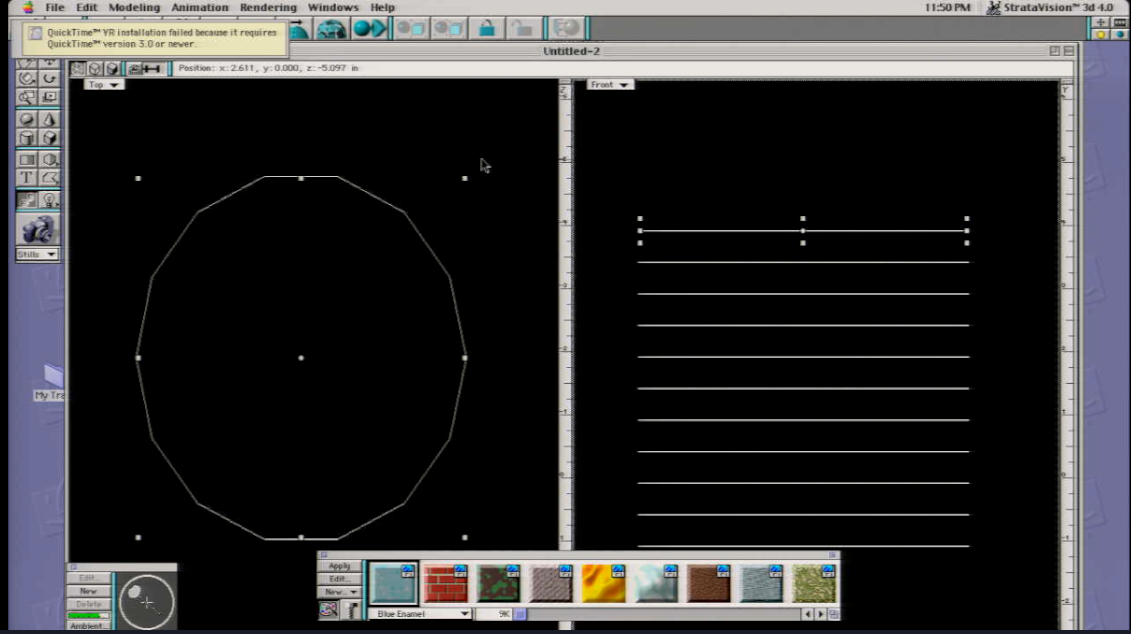
For this part, use the scale tool to scale out the polygon, What you're doing is sculpting out the shape so it matches sort of like the Spine of the object When you are done sculpting the shape, Use the link function
Start linking one by one,hold your mouse on the first polygon and drag it to the next polygon.It should show that the two polygons are linked. note: The first polygon will determine the shape, So in other words, If you start with the shape at the top, then shape will be molded top to bottom, (Vice versa).Drag the last polygon to the next polygon. If you are confused how to do this, essentially drag the parent to the child. and those two will link, then, drag child to the next child(the child will become the parent) . Repeat this until the entire shape is linked together.
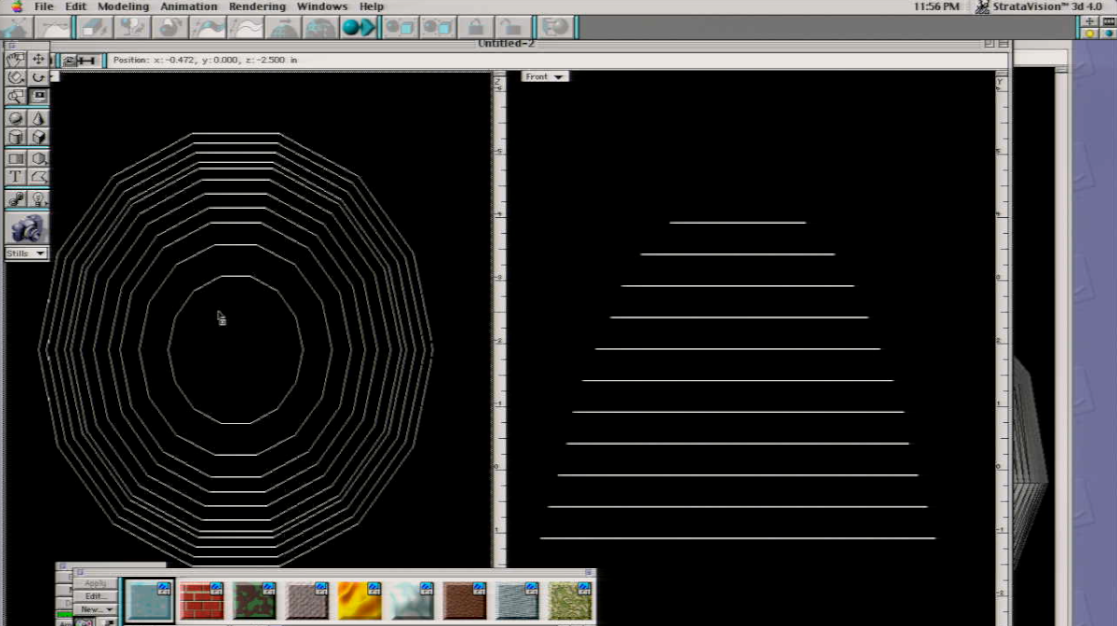
Once the shape is linked together, you can now rotate the entire object without rotating the polygons one by one. I selected the the polygon right before the last three polygons.I rotated the polygons more toward the right on the YZ axis.
once you have finished molding your shape.Use the selection tool and to select all the polygons.
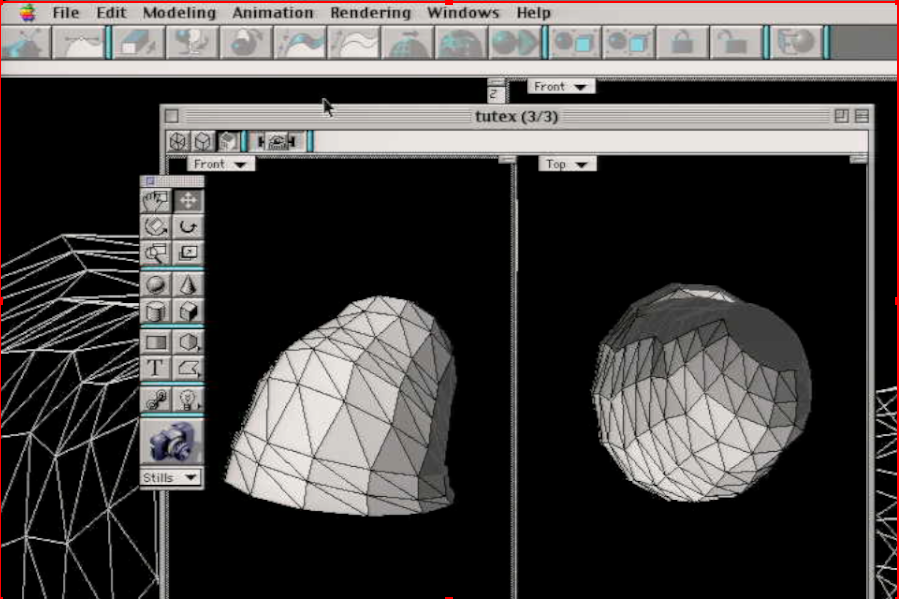
Go to Modify>skin(or click the button with the two arrows with a wavy looking curve),Click either the polygon surfaces tab and set the rotation angle to 180.
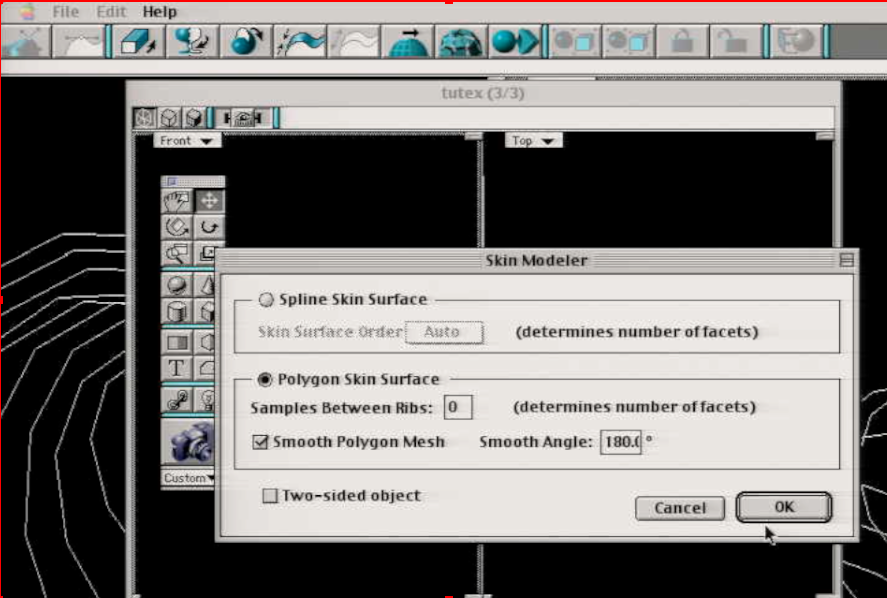
Result
Making a pencil(Lathe and faceting)
Part of this tutorial from the book utilizes texturing, for now, I will show only how to create a pencil only using lathe and use faceting
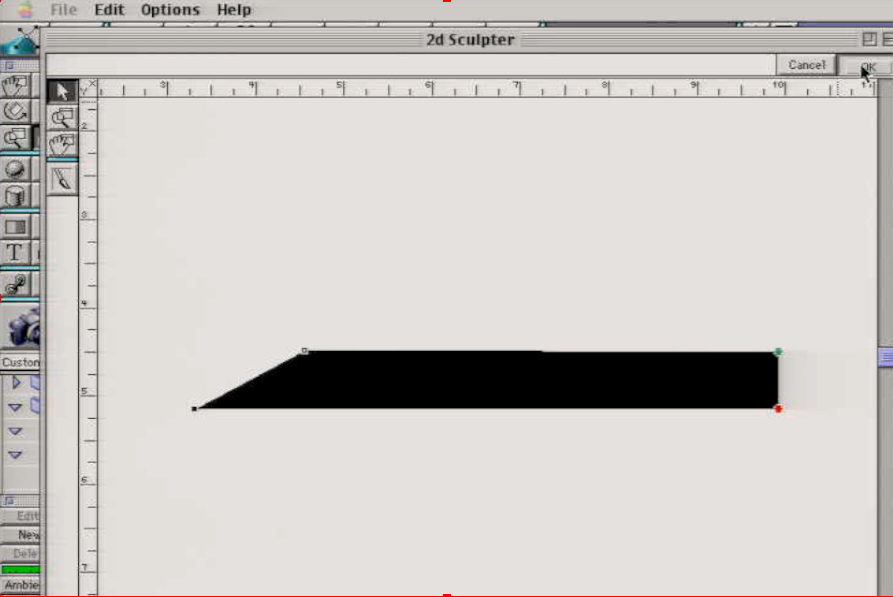
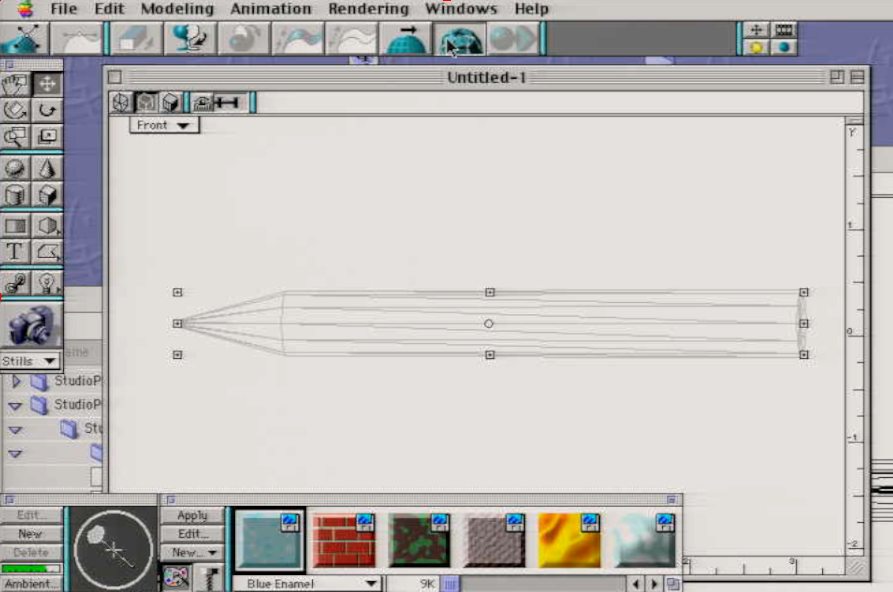
Draw a filled rectangle. Have your view set to front.

I scaled my rectangle a bit to fit the view. This step is optional if you've drawn it the way you need it.
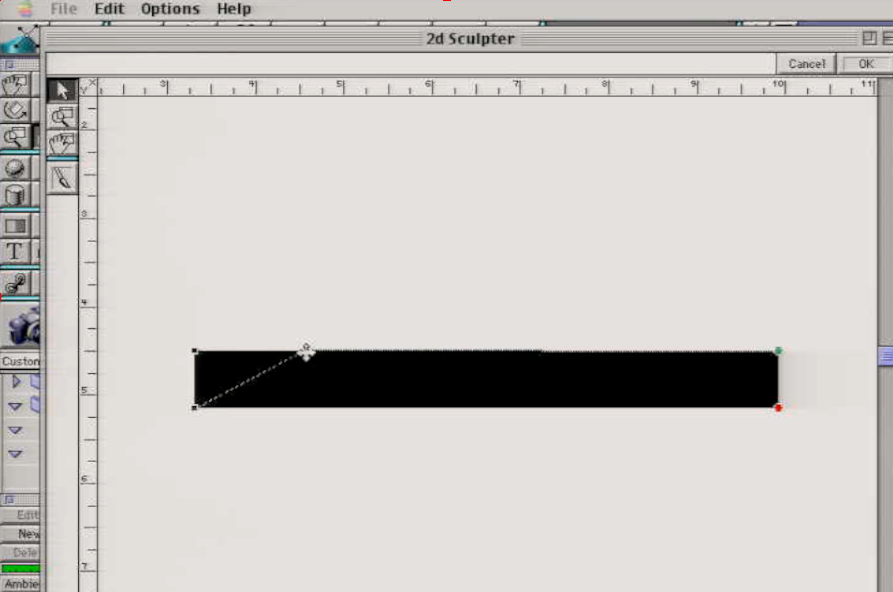
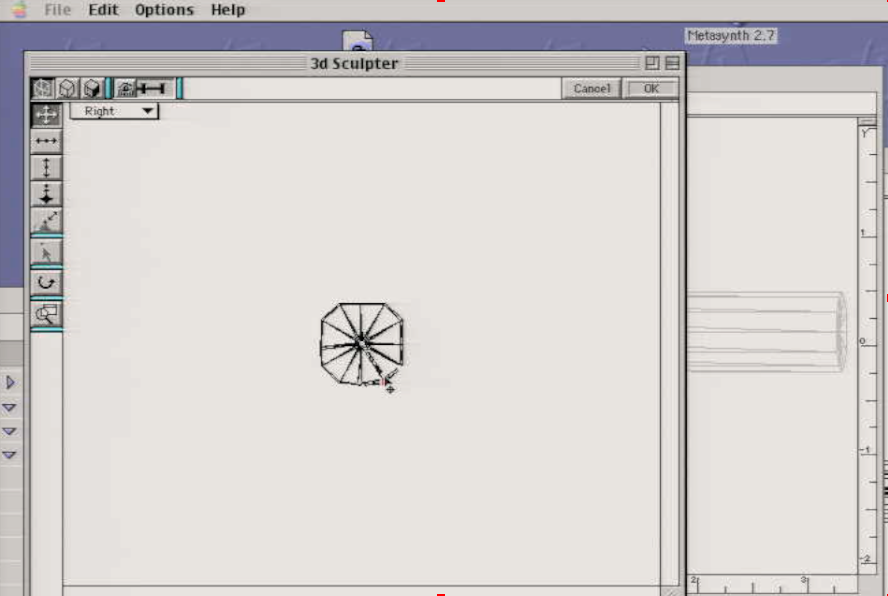
Go to 2D sculpter tab.

Drag either top left of top right point about 4 1/2 or 5 1/2 inches
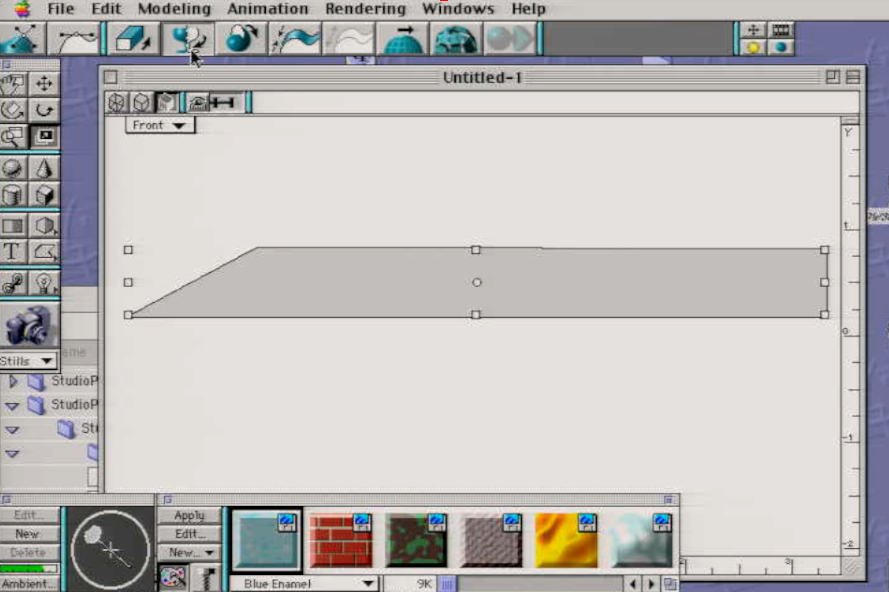
Click either the icon that looks like a wine glass, or go to Modeling>Swept surface>Lathe
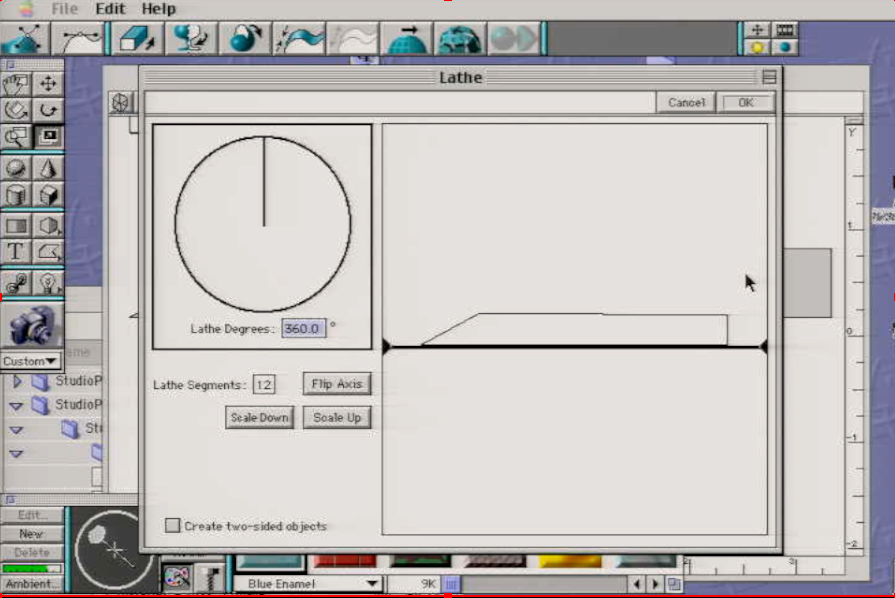
Set the segments to 12, and the rotation to 360. You need the like to align to the bottom of the edge. Try to get the line(looks like two triangles on the left and right hand side) to align close to the edge as possible. You could grab this line without touching those triangles. This is because we are adding geometry that would rotate 360 degrees press OK.
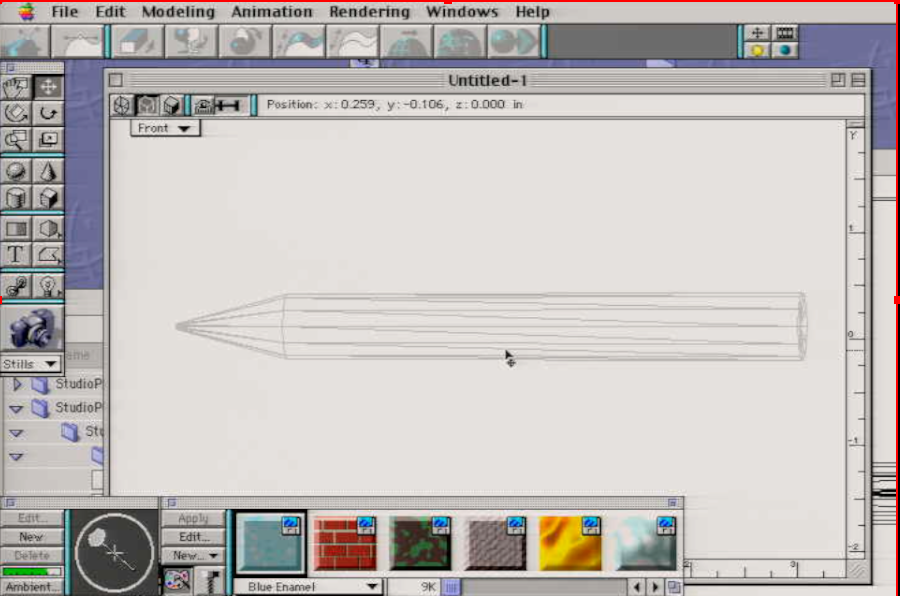

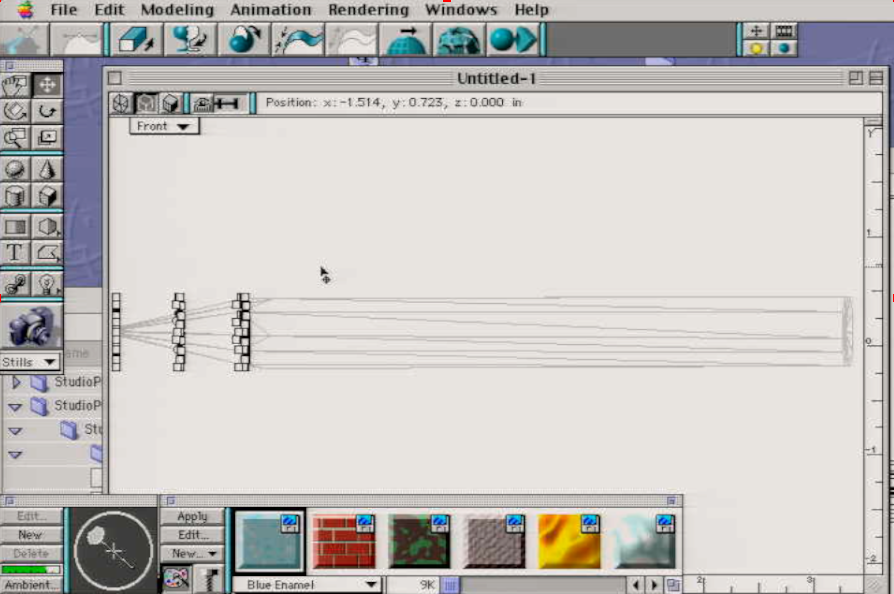
Edit your mesh by clicking 3d sculpter tab. ignore the message
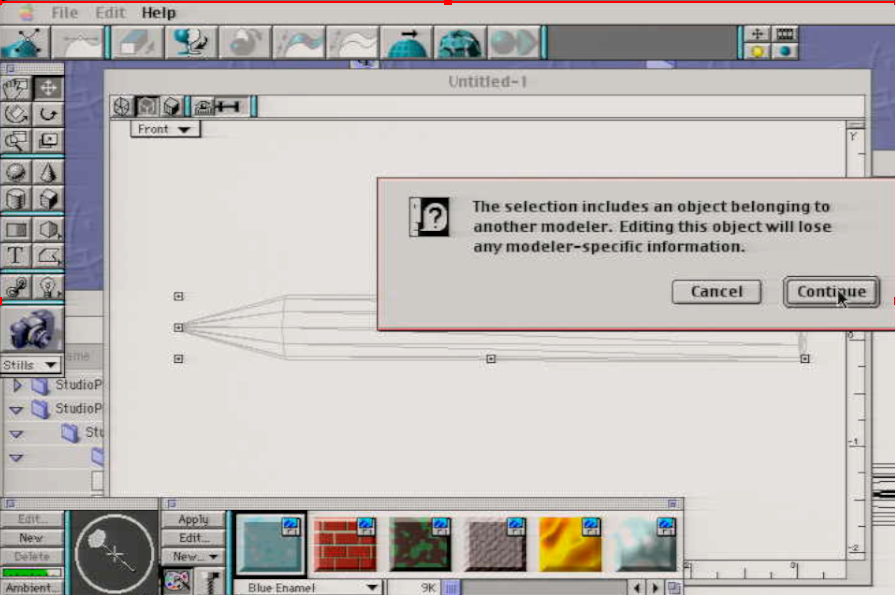
Try to drag the points away from the pencil's point.
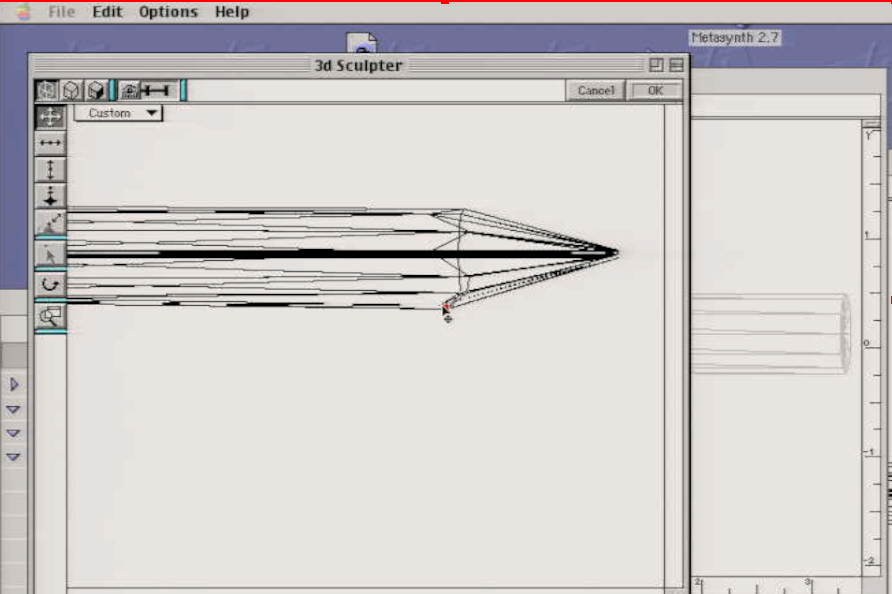
Drag the points inward so they have the shape of a pencil
Press OK
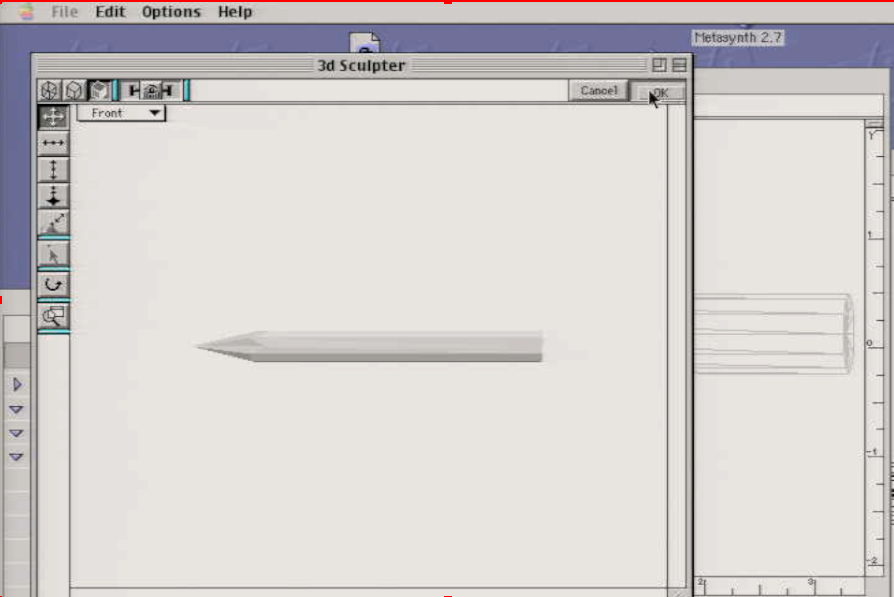
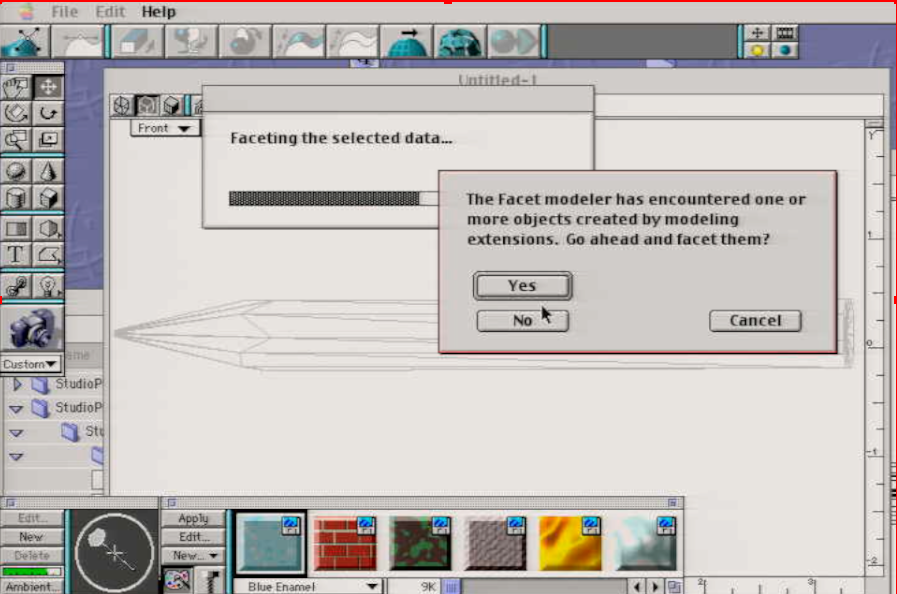
Select your model, then click the icon on the far right or go to Modeling>Resurfacing>Facet
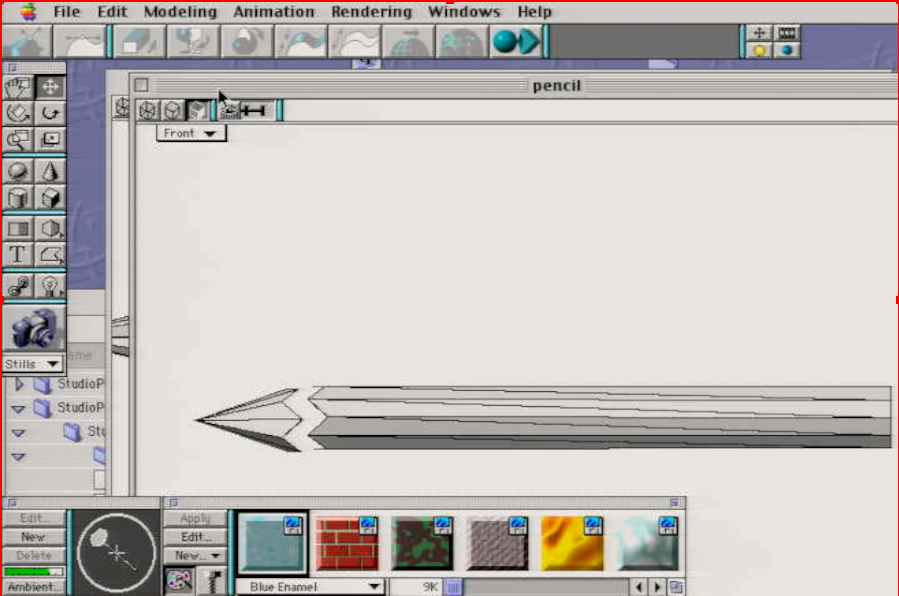
Click OK,This will create three faceted parts. Each of these pieces can be textured seperately.
You will now be able to seperate these parts for texturing
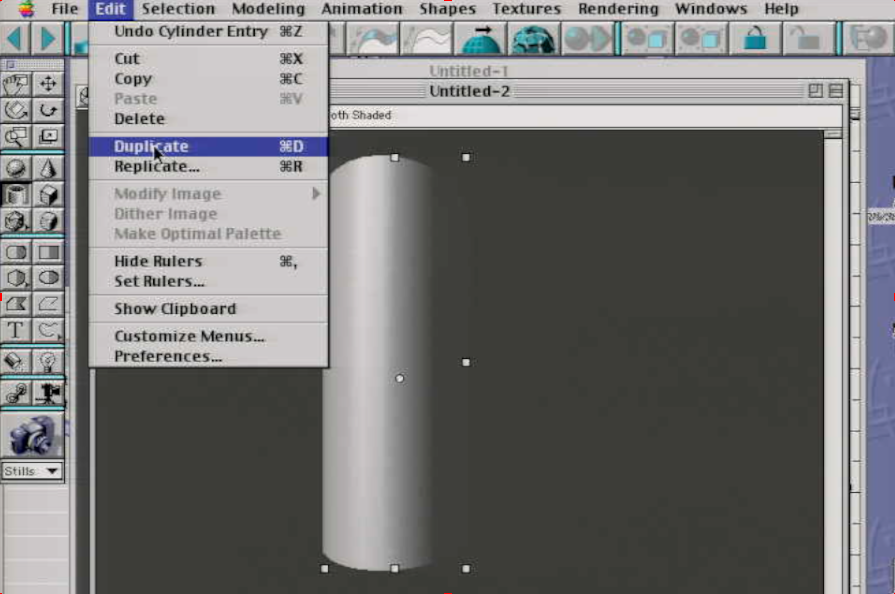
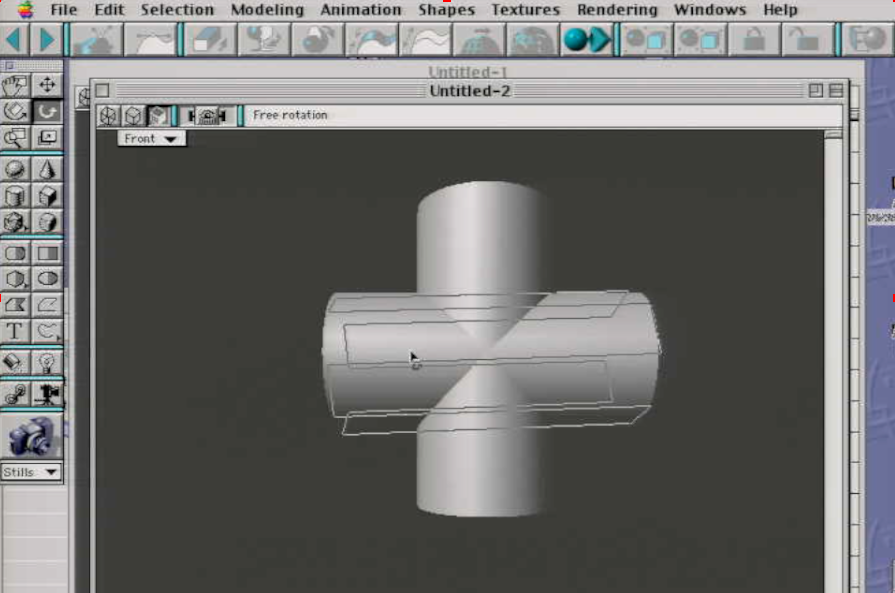
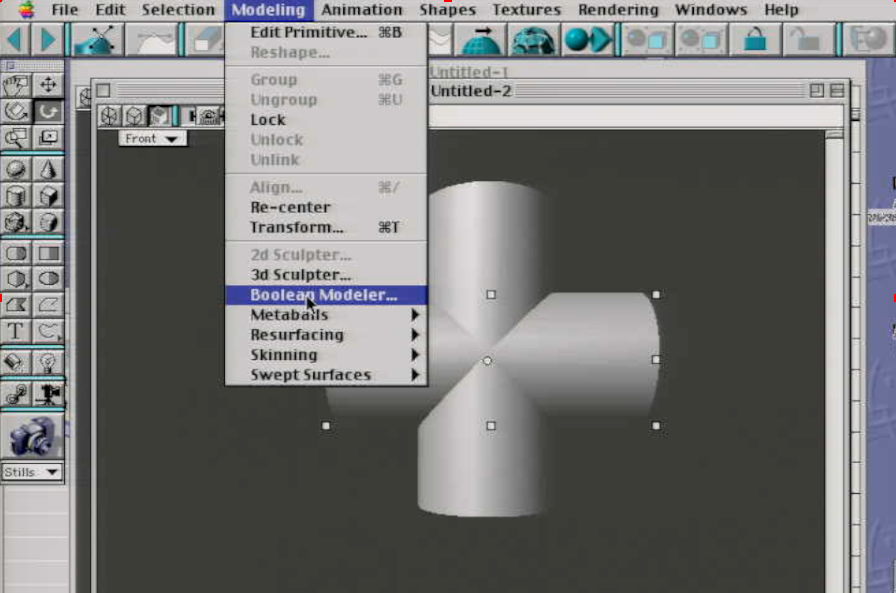
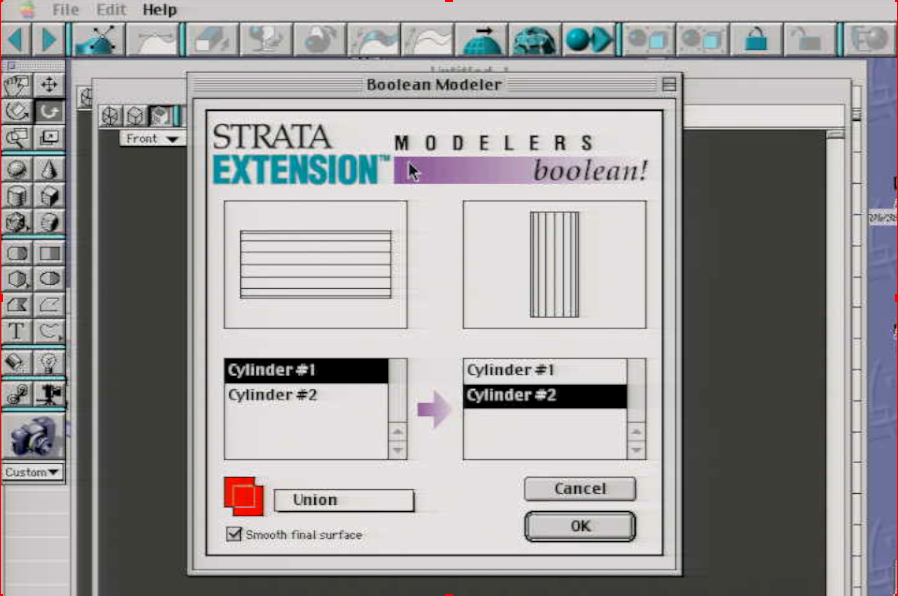
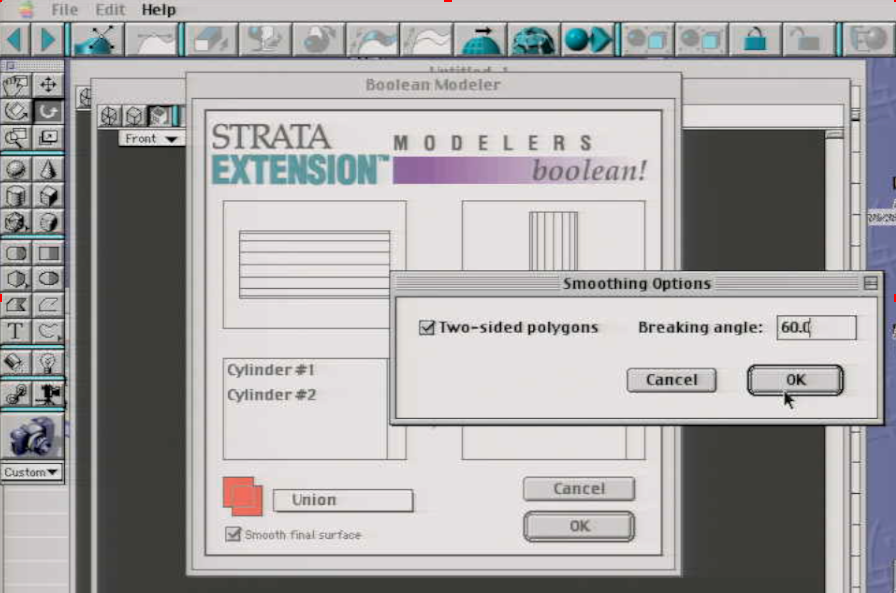
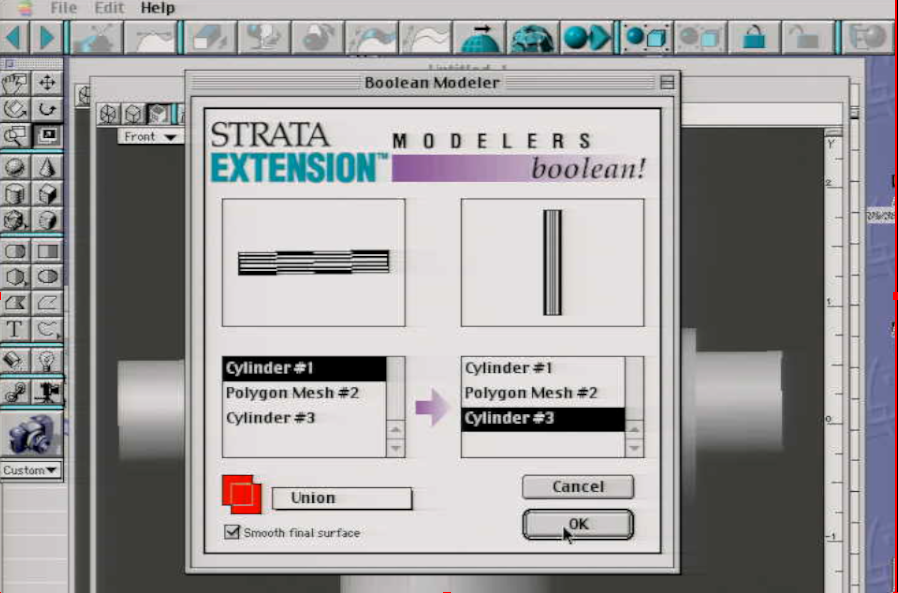
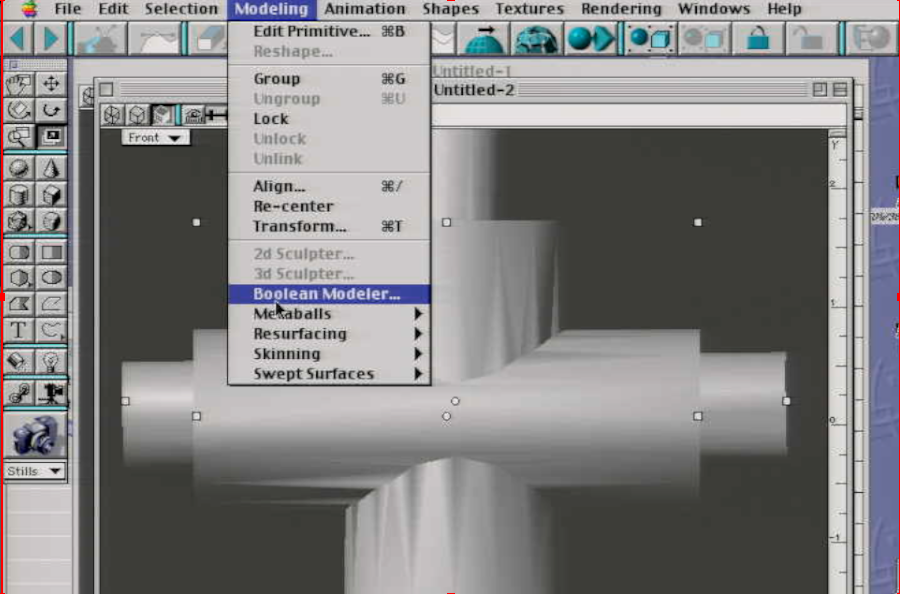
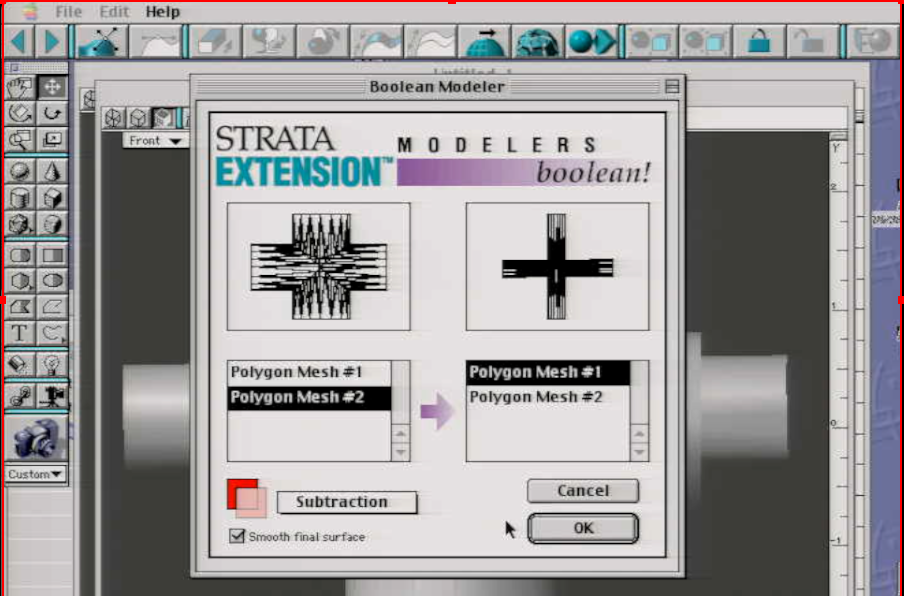
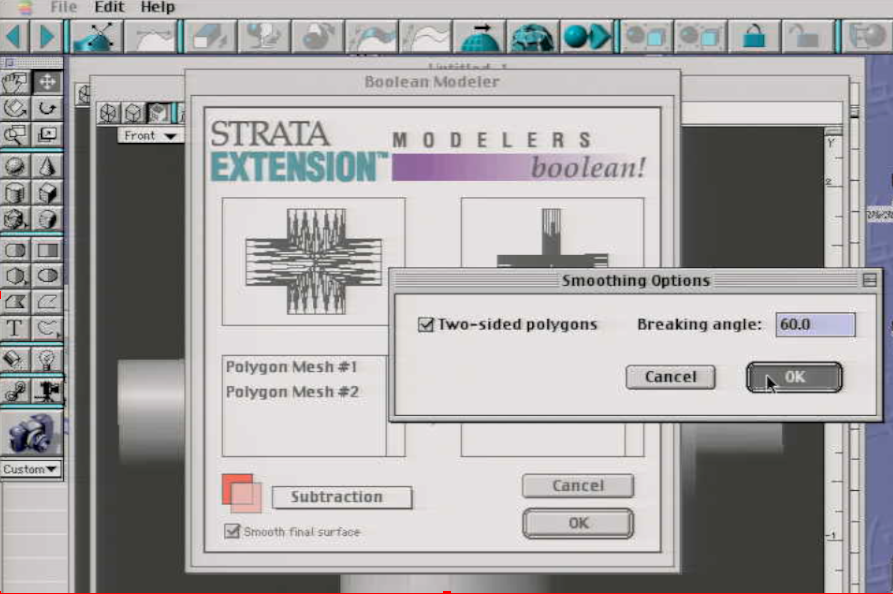
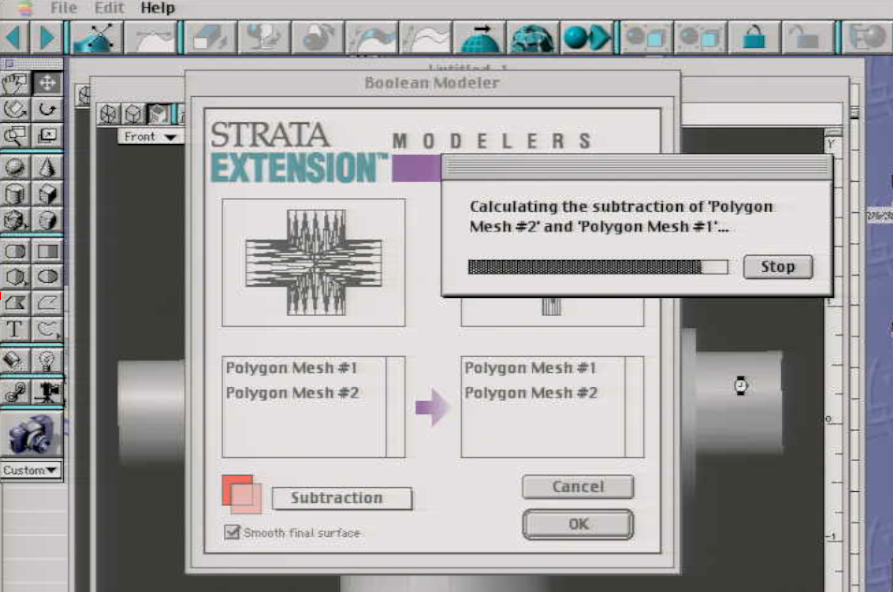
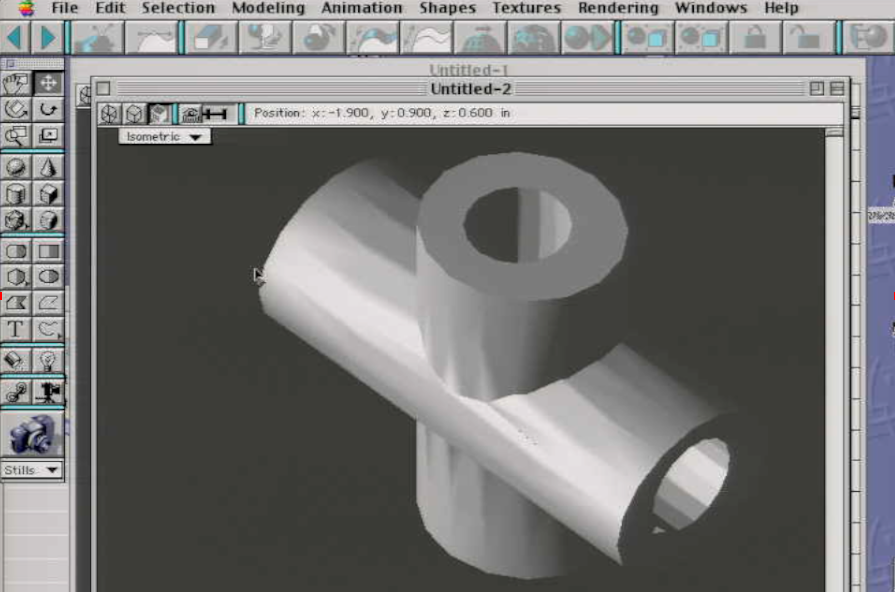
Boolean Modeler
booleans are pretty straightforward in this software. If you've used any 3D software before, This shouldn't be to hard to understand. Here is an example using Union and substraction in the Boolean Modeler:

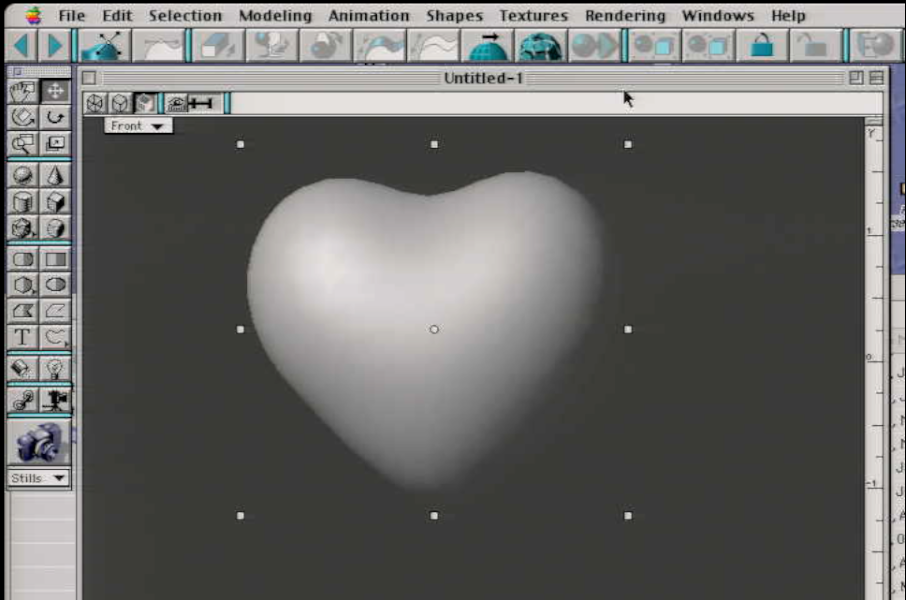
Making a Heart (MetaBalls)
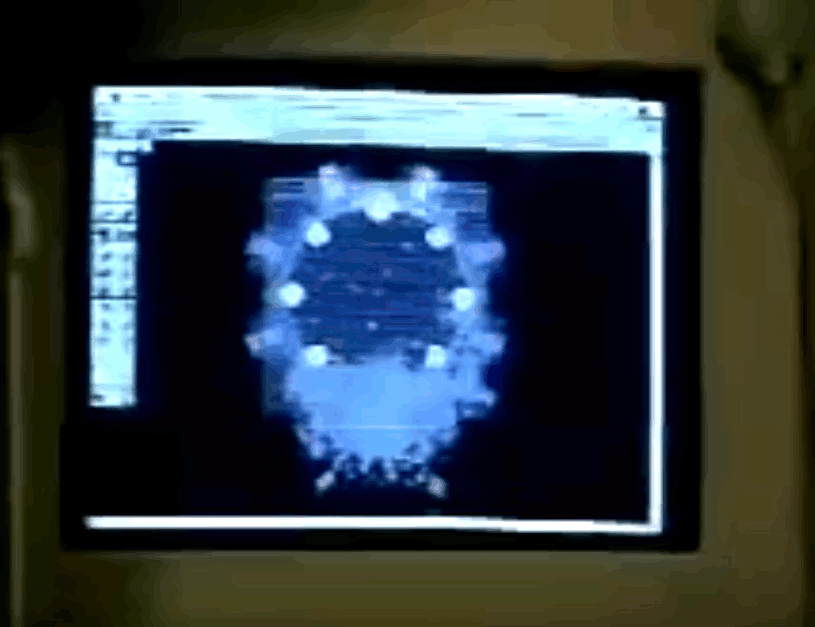
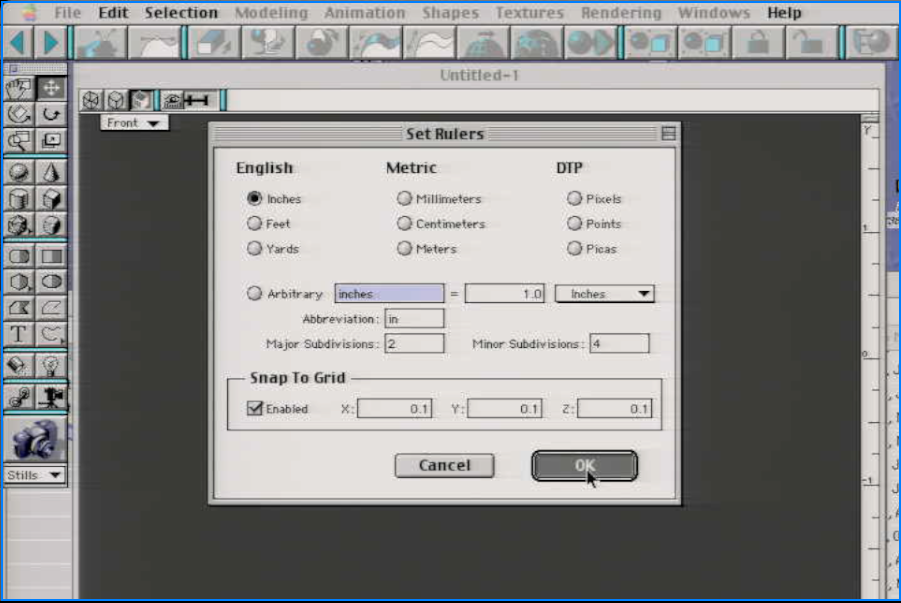
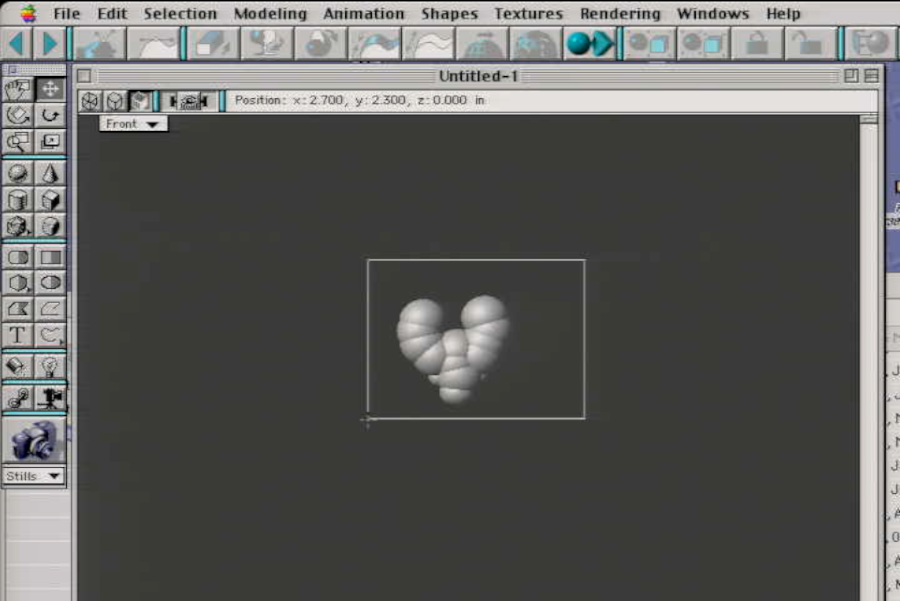
This tutorial is for Strata Studio Pro. I am using Blitz 1.75+.MetaBalls allows you to melt surfaces together using seperate spherical shapes.In this Example, I will be making a heart. Using metaBalls, Note: i have already set it up because it would be too long if i showed you one by one drawing a sphere. I will tell you, To make things easier, Make sure you have snapping enabled. You can find it in the Edit>Set Rulers tab
Duplicate many spheres, You'll want to have the spheres close together. Select them all when you are done.
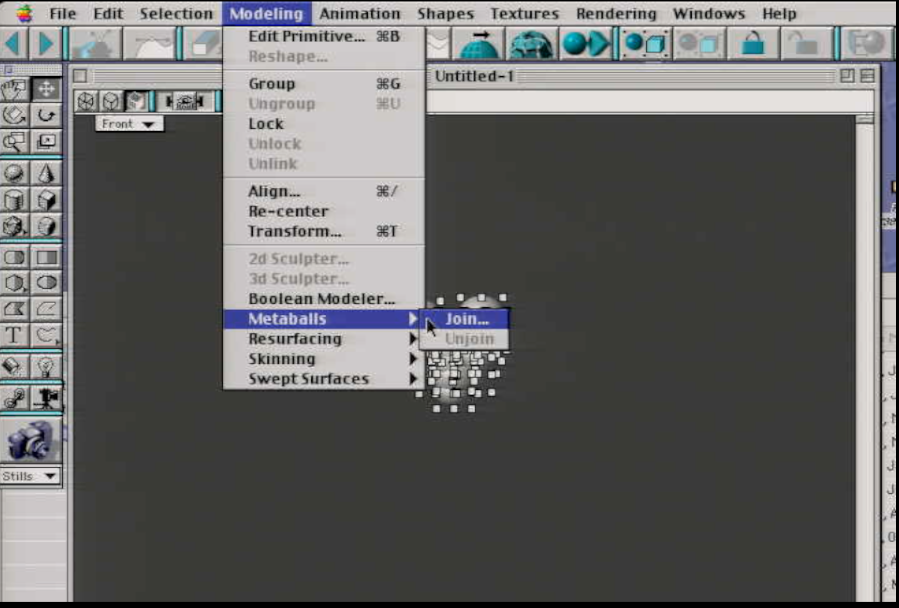
Go to modeling>Metaballs Join or click icon with the three balls. StudioPro has a few more features then vision 3D.The UI is practically the same.
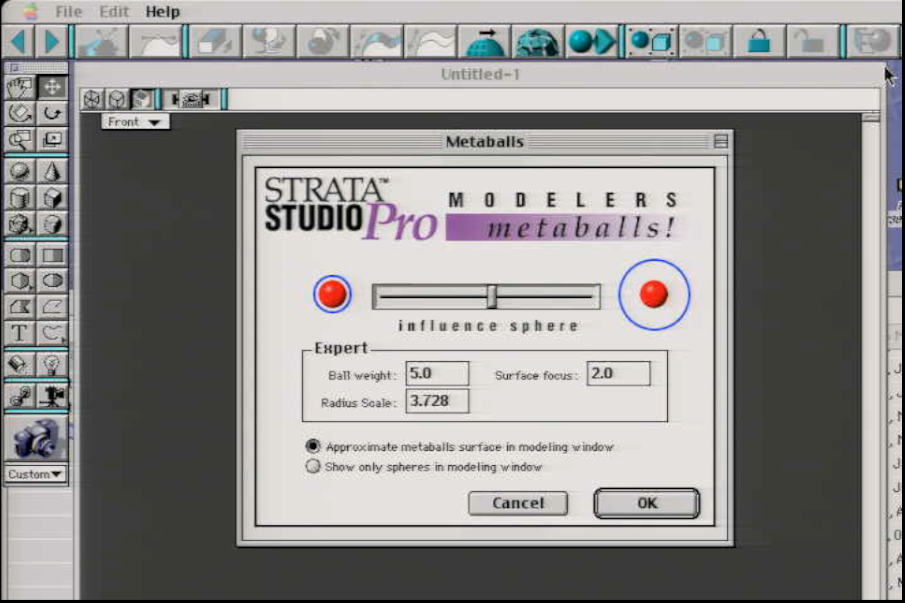
Result. You can always fix the shape by going to metaballs>unjoin and adding/removing spheres.